No. 0119
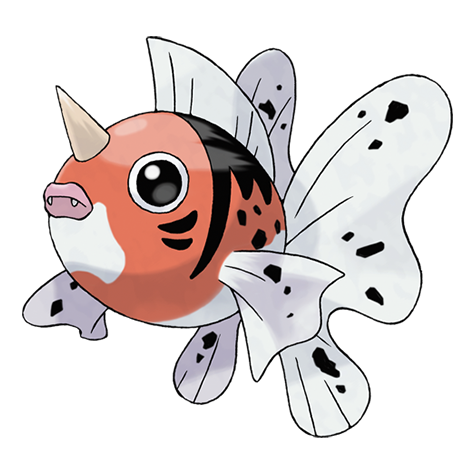
Seaking
Goldfish Pokémon
Turn it with the arrows or by dragging · pinch or scroll to zoom. Fan-made model from the Pokémon 3D API project.
- Height
- 1.3 m 4′03″
- Weight
- 39 kg 86.0 lbs
- Base stat total
- 450 Higher than 49% of Pokémon
- Introduced
- Gen I Red & Green (JP)
Using its horn, it bores holes in riverbed boulders, making nests to prevent its eggs from washing away.
Base stats
Ranges in Pokémon Champions at Lv 50: 0 Stat Points with a −10% Stat Alignment to 32 Stat Points with a +10% one (HP has no alignment).Ranges in the main games at Lv 100: 0 IV/EV with a hindering nature to 31 IV/252 EV with a helpful nature. EV yield: 2 Atk.
Stat calculatorChampions Stat Points & Stat Alignment, or EVs, IVs & nature
Type matchups
Weak to
Resists
Takes normal damage from 12 types
With : Electric becomes 0×
Speed tiers
The faster Pokémon moves first each turn, so knowing who you outspeed decides a lot of battles. These are its Speed values at Lv 50 in Pokémon Champions (base Speed 68); Scarf and Tailwind use the Max+ value.
At max Speed, Seaking outspeeds 13 of the 30 most used Pokémon in Champions VGC on Showdown.
- 203
 Mega Garchomp ZModest · 32 SP · #21 on Showdown
- 200
 Mega GengarTimid · 32 SP · #26 on Showdown
- 190
 Mega Raichu YTimid · 23 SP · #13 on Showdown
- 189
 Mega SalamenceTimid · 32 SP · #4 on Showdown
- 184
 WhimsicottTimid · 32 SP · #23 on Showdown
- 178
 Mega MetagrossJolly · 32 SP · #28 on Showdown
- 178
 Mega StaraptorJolly · 32 SP · #29 on Showdown
- 172
 SneaslerAdamant · 32 SP · #2 on Showdown
- 169
 Mega FloetteTimid · 32 SP · #17 on Showdown
- 169
 GarchompJolly · 32 SP · #19 on Showdown
- 167
 Mega Charizard YTimid · 32 SP · #14 on Showdown
- 167
 Mega GardevoirTimid · 32 SP · #20 on Showdown
- 161
 IndeedeeTimid · 32 SP · #30 on Showdown
- 156
 Hisuian ArcanineJolly · 32 SP · #16 on Showdown
- 150
 ArchaludonTimid · 32 SP · #9 on Showdown
- 149
 GholdengoTimid · 32 SP · #8 on Showdown
- 143
 BasculegionJolly · 32 SP · #6 on Showdown
- 132Seaking · Max+32 SP, Speed-raising alignment
- 128
 PelipperTimid · 32 SP · #12 on Showdown
- 120Seaking · Max32 SP, neutral alignment
- 120
 VolcaronaBold · 0 SP · #25 on Showdown
- 105
 RillaboomAdamant · 0 SP · #1 on Showdown
- 101
 MiloticCalm · 0 SP · #15 on Showdown
- 95
 SylveonModest · 15 SP · #18 on Showdown
- 94
 Female IndeedeeRelaxed · 0 SP · #7 on Showdown
- 90
 PolitoedCalm · 0 SP · #22 on Showdown
- 90
 SinistchaBold · 0 SP · #24 on Showdown
- 88Seaking · No SP0 SP, neutral alignment
- 85
 ArmarougeQuiet · 0 SP · #27 on Showdown
- 80
 IncineroarCareful · 0 SP · #3 on Showdown
- 80
 FarigirafBold · 0 SP · #11 on Showdown
- 70
 KingambitAdamant · 0 SP · #5 on Showdown
- 60
 Mega GolisopodAdamant · 0 SP · #10 on Showdown
Smogon · Showdown Others at their most common Speed investment in Champions VGC (Reg M-C · Doubles, Sep 2026); Pokémon holding a Mega Stone are shown as their Mega.
Abilities
If Rain is active, this Pokémon's Speed is doubled.
Everything about Swift Swim →Other Pokémon with Swift Swim 44
 Psyduck
 Golduck
 Poliwag
 Poliwhirl
 Poliwrath
 Horsea
 Goldeen
 Magikarp
 Omanyte
 Omastar
 Kabuto
 Kabutops
 Qwilfish
 Mantine
 Kingdra
 Mega Swampert
 Lotad
 Lombre
 Ludicolo
 Surskit
 Anorith
 Armaldo
 Feebas
 Huntail
 Gorebyss
 Relicanth
 Luvdisc
 Buizel
 Floatzel
 Finneon
 Lumineon
 Mantyke
 Tympole
 Palpitoad
 Seismitoad
 Tirtouga
 Carracosta
 Beartic
 Chewtle
 Drednaw
 Arrokuda
 BarraskewdaBasculegion
 Overqwil
This Pokémon cannot be burned. Gaining this Ability while burned cures it.
Everything about Water Veil →This Pokémon draws Electric moves to itself to raise Sp. Atk by 1; Electric immunity.
Everything about Lightning Rod →
 Wailmer
 Wailord
 Finizen
 Dondozo
 Pikachu
 Raichu
 Cubone
 Marowak
 Rhyhorn
 Rhydon
 Pichu
 Mega Sceptile
 Electrike
 Manectric
 Plusle
 Rhyperior
 Blitzle
 Zebstrika
 Togedemaru
 Pincurchin
Competitive
Smogon · Showdown On Showdown
Not used in the tracked Showdown formats this month.
Other Showdown formats Scarlet & Violet, with Tera
Evolution

Moves
Level up 12
TM / HM / TR 21
No moves match those filters.
Biology
Seaking is known to be able to swim against streams and up waterfalls. It will use its horn to bore holes into rocks to lay eggs in. Fans of Seaking's horn and fins are known to fight each other.
Adapted from Wikipedia: List of generation I Pokémon · CC BY-SA 4.0 · edited.
Pokédex entries
- Goldfish Pokémon
- Kanto · Red & Green (JP)
- Color
- Red
- Water's Edge
- Pal Park area
- Pond
To attract females, males dance on the river’s floor. The females gather around the male that dances most gracefully.
Ultra MoonIts horn spins like a drill to steadily hollow out rocks—even harder ones. The coloration of the male is more vivid.
Ultra SunTrainers who are crazy for Seaking are divided into horn enthusiasts and fin enthusiasts. The two groups do not get along well.
MoonWhen the weather grows cold, its whole body flushes a deep red. This sight serves as a poetic reminder that autumn has arrived.
SunDuring spawning season, SEAKING gather from all over, causing rivers to appear a brilliant red.
HeartGoldIn autumn, its body becomes more fatty in preparing to propose to a mate. It takes on beautiful colors.
Platinum · Black · White · Black 2 · White 2 · SwordTo protect its family, it will fight with its drill-sharp horn. It lives in hollowed rocks in streams.
PearlIt makes its nest by hollowing out boulders in streams with its horn. It defends its eggs with its life.
Diamond · YThe horn on its head is sharp like a drill. It bores a hole in a boulder to make its nest.
FireRedIt punches holes in boulders on streambeds. This is a clever innovation that prevents its eggs from being attacked or washed away by the current.
EmeraldSEAKING is very protective of its eggs. The male and female will take turns patrolling around their nest and eggs. The guarding of eggs by these Pokémon goes on for over a month.
Sapphire · Alpha SapphireIn the autumn, SEAKING males can be seen performing courtship dances in riverbeds to woo females. During this season, this Pokémon’s body coloration is at its most beautiful.
Ruby · Omega RubyWhen autumn comes, the males patrol the area around their nests in order to protect their offspring.
CrystalUsing its horn, it bores holes in riverbed boulders, making nests to prevent its eggs from washing away.
Silver · SoulSilver · ShieldDuring spawning season, SEAKING gather from all over, coloring the rivers a brilliant red.
GoldIt is the male's job to make a nest by carving out boulders in a stream using the horn on its head.
Yellow · Let’s Go, Pikachu! · Let’s Go, Eevee!In the autumn spawning season, they can be seen swimming powerfully up rivers and creeks.
Red · Blue · LeafGreen · X
Names around the world
- English
- Seaking
- Japanese
- アズマオウ
- Japanese (romaji)
- Azumao
- Korean
- 왕콘치
- Chinese (Traditional)
- 金魚王
- Chinese (Simplified)
- 金鱼王
- French
- Poissoroy
- German
- Golking
- Spanish
- Seaking
- Italian
- Seaking
Sprites
Artwork and 3D models
Gen VIII · Gen VII · Gen VI · Gen V
Generation IV
Generation III
Generation II
Generation I
Training
- 2 Atk
- 60 ≈7.8% with a Poké Ball at full HP
- 70
- 158
- Medium
Breeding
- Water 2
- ♂ 50%♀ 50%
- 20 egg cycles ≈5,355 steps (Gen IV–VII)
Males and females look different


Where to find
Evolves from Goldeen: Level 33.
Shield: The Crown Tundra 1 area
- Max LairCapture during a Dynamax Adventure. · Lv 65
Shield: The Isle of Armor 3 areas
- Courageous Cavern (Max Den E)Catch a wild Dynamax or Gigantamax Pokémon in a Max Raid battle. · Lv 45–60
- Fields of Honor (Max Den G)Catch a wild Dynamax or Gigantamax Pokémon in a Max Raid battle. · Lv 45–60
- Soothing Wetlands (Max Den I)Catch a wild Dynamax or Gigantamax Pokémon in a Max Raid battle. · Lv 45–60
Green 4 areas
- Cerulean Cave (1F)Fishing with a Super Rod · Lv 23
- Cerulean Cave (B1F)Fishing with a Super Rod · Lv 23
- Fuchsia CityFishing with a Super Rod · Lv 23
- Road 23Fishing with a Super Rod · Lv 23
Red 4 areas
- Cerulean Cave (1F)Fishing with a Super Rod · Lv 23
- Cerulean Cave (B1F)Fishing with a Super Rod · Lv 23
- Fuchsia CityFishing with a Super Rod · Lv 23
- Road 23Fishing with a Super Rod · Lv 23
Sword: The Crown Tundra 1 area
- Max LairCapture during a Dynamax Adventure. · Lv 65
Sword: The Isle of Armor 3 areas
- Courageous Cavern (Max Den E)Catch a wild Dynamax or Gigantamax Pokémon in a Max Raid battle. · Lv 45–60
- Fields of Honor (Max Den G)Catch a wild Dynamax or Gigantamax Pokémon in a Max Raid battle. · Lv 45–60
- Soothing Wetlands (Max Den I)Catch a wild Dynamax or Gigantamax Pokémon in a Max Raid battle. · Lv 45–60
Shield 6 areas
- Bridge FieldSpecial overworld spawn in a fixed location in the water. · Lv 46–60
- East Lake AxewellSpecial overworld spawn in a fixed location in the water. · Lv 46–60
- Lake of OutrageSpecial overworld spawn in a fixed location in the water. · Lv 46–60
- North Lake MilochSpecial overworld spawn in a fixed location in the water. · Lv 46–60
- South Lake Miloch (Main Area)Special overworld spawn in a fixed location in the water. · Lv 46–60
- West Lake AxewellSpecial overworld spawn in a fixed location in the water. · Lv 46–60
Sword 6 areas
- Bridge FieldSpecial overworld spawn in a fixed location in the water. · Lv 46–60
- East Lake AxewellSpecial overworld spawn in a fixed location in the water. · Lv 46–60
- Lake of OutrageSpecial overworld spawn in a fixed location in the water. · Lv 46–60
- North Lake MilochSpecial overworld spawn in a fixed location in the water. · Lv 46–60
- South Lake Miloch (Main Area)Special overworld spawn in a fixed location in the water. · Lv 46–60
- West Lake AxewellSpecial overworld spawn in a fixed location in the water. · Lv 46–60
Let’s Go, Eevee! 1 area
- Road 6Surfing in the overworld · Lv 11–16
Let’s Go, Pikachu! 1 area
- Road 6Surfing in the overworld · Lv 11–16
Ultra Moon 2 areas
- Brooklet HillSOS Battle, SOS Battle from bubbling spots · Lv 10–21
- Malie GardenSOS Battle, SOS Battle from bubbling spots · Lv 10–33
Ultra Sun 2 areas
- Brooklet HillSOS Battle, SOS Battle from bubbling spots · Lv 10–21
- Malie GardenSOS Battle, SOS Battle from bubbling spots · Lv 10–33
Moon 2 areas
- Brooklet HillSOS Battle, SOS Battle from bubbling spots · Lv 10–15
- Malie GardenSOS Battle · Lv 10–27
Sun 2 areas
- Brooklet HillSOS Battle, SOS Battle from bubbling spots · Lv 10–15
- Malie GardenSOS Battle · Lv 10–27
Y 3 areas
- Parfum PalaceFishing with a Super Rod · Lv 35
- Road 22Fishing with a Super Rod · Lv 35
- Road 3Fishing with a Super Rod · Lv 35
X 3 areas
- Parfum PalaceFishing with a Super Rod · Lv 35
- Road 22Fishing with a Super Rod · Lv 35
- Road 3Fishing with a Super Rod · Lv 35
White 2 8 areas
- Abundant ShrineFishing in dark spots · Lv 50–70
- Aspertia CityFishing in dark spots · Lv 50–70
- Pinwheel Forest (inside)Fishing in dark spots · Lv 35–70
- Road 11Fishing in dark spots · Lv 50–70
- Road 14Fishing in dark spots · Lv 50–70
- Road 22Fishing in dark spots · Lv 50–70
- Road 3Fishing in dark spots · Lv 50–70
- Striaton CityFishing in dark spots · Lv 50–70
Black 2 8 areas
- Abundant ShrineFishing in dark spots · Lv 50–70
- Aspertia CityFishing in dark spots · Lv 50–70
- Pinwheel Forest (inside)Fishing in dark spots · Lv 35–70
- Road 11Fishing in dark spots · Lv 50–70
- Road 14Fishing in dark spots · Lv 50–70
- Road 22Fishing in dark spots · Lv 50–70
- Road 3Fishing in dark spots · Lv 50–70
- Striaton CityFishing in dark spots · Lv 50–70
White 6 areas
- Abundant ShrineFishing in dark spots · Lv 35–70
- Pinwheel Forest (inside)Fishing in dark spots · Lv 35–70
- Road 11Fishing in dark spots · Lv 35–70
- Road 14Fishing in dark spots · Lv 35–70
- Road 3Fishing in dark spots · Lv 35–70
- Striaton CityFishing in dark spots · Lv 35–70
Black 6 areas
- Abundant ShrineFishing in dark spots · Lv 35–70
- Pinwheel Forest (inside)Fishing in dark spots · Lv 35–70
- Road 11Fishing in dark spots · Lv 35–70
- Road 14Fishing in dark spots · Lv 35–70
- Road 3Fishing in dark spots · Lv 35–70
- Striaton CityFishing in dark spots · Lv 35–70
SoulSilver 24 areas
- Cerulean CityFishing with a Super Rod, Surfing · Lv 10–40
- Dark Cave (Blackthorn City entrance)Fishing with a Super Rod · Lv 40
- Dark Cave (Violet City entrance)Fishing with a Super Rod · Lv 40
- Mount Mortar (1F)Fishing with a Super Rod, Surfing · Lv 15–40
- Mount Mortar (B1F)Fishing with a Super Rod, Surfing · Lv 15–40
- Mount Mortar (Upper Cave)Fishing with a Super Rod, Surfing · Lv 20–40
- Mount Silver (1F top)Fishing with a Super Rod, Surfing · Lv 30–45
- Mount Silver (1F)Fishing with a Good Rod, Fishing with a Super Rod, Surfing · Lv 20–50
- Mount Silver (2F)Fishing with a Super Rod, Surfing · Lv 30–45
- Mount Silver (4F)Fishing with a Super Rod, Surfing · Lv 30–45
- Mount Silver (top)Fishing with a Super Rod, Surfing · Lv 30–45
- Road 10Fishing with a Super Rod, Surfing · Lv 15–40
- Road 24Fishing with a Super Rod, Surfing · Lv 10–40
- Road 25Fishing with a Super Rod, Surfing · Lv 10–40
- Road 4Fishing with a Super Rod, Surfing · Lv 10–40
- Road 42Fishing with a Super Rod, Surfing · Lv 15–40
- Road 9Fishing with a Super Rod, Surfing · Lv 15–40
- Safari Zone Rocky BeachFishing with a Super Rod · Lv 35–38
- Safari Zone SwampFishing with a Good Rod, Fishing with a Super Rod, Fishing with an Old Rod, Surfing · Lv 17–42
- Slowpoke Well (1F)Fishing with a Super Rod · Lv 40
- Slowpoke Well (B1F)Fishing with a Super Rod · Lv 40
- Tohjo FallsFishing with a Super Rod, Surfing · Lv 20–40
- Union Cave (1F)Fishing with a Super Rod · Lv 40
- Union Cave (B1F)Fishing with a Super Rod · Lv 40
HeartGold 24 areas
- Cerulean CityFishing with a Super Rod, Surfing · Lv 10–40
- Dark Cave (Blackthorn City entrance)Fishing with a Super Rod · Lv 40
- Dark Cave (Violet City entrance)Fishing with a Super Rod · Lv 40
- Mount Mortar (1F)Fishing with a Super Rod, Surfing · Lv 15–40
- Mount Mortar (B1F)Fishing with a Super Rod, Surfing · Lv 15–40
- Mount Mortar (Upper Cave)Fishing with a Super Rod, Surfing · Lv 20–40
- Mount Silver (1F top)Fishing with a Super Rod, Surfing · Lv 30–45
- Mount Silver (1F)Fishing with a Good Rod, Fishing with a Super Rod, Surfing · Lv 20–50
- Mount Silver (2F)Fishing with a Super Rod, Surfing · Lv 30–45
- Mount Silver (4F)Fishing with a Super Rod, Surfing · Lv 30–45
- Mount Silver (top)Fishing with a Super Rod, Surfing · Lv 30–45
- Road 10Fishing with a Super Rod, Surfing · Lv 15–40
- Road 24Fishing with a Super Rod, Surfing · Lv 10–40
- Road 25Fishing with a Super Rod, Surfing · Lv 10–40
- Road 4Fishing with a Super Rod, Surfing · Lv 10–40
- Road 42Fishing with a Super Rod, Surfing · Lv 15–40
- Road 9Fishing with a Super Rod, Surfing · Lv 15–40
- Safari Zone Rocky BeachFishing with a Super Rod · Lv 35–38
- Safari Zone SwampFishing with a Good Rod, Fishing with a Super Rod, Fishing with an Old Rod, Surfing · Lv 17–42
- Slowpoke Well (1F)Fishing with a Super Rod · Lv 40
- Slowpoke Well (B1F)Fishing with a Super Rod · Lv 40
- Tohjo FallsFishing with a Super Rod, Surfing · Lv 20–40
- Union Cave (1F)Fishing with a Super Rod · Lv 40
- Union Cave (B1F)Fishing with a Super Rod · Lv 40
Platinum 15 areas
- Celestic TownFishing with a Super Rod · Lv 40–55
- Lake AcuityFishing with a Good Rod, Fishing with a Super Rod · Lv 25–55
- Lake ValorFishing with a Good Rod, Fishing with a Super Rod · Lv 25–55
- Lake Verity (after Galactic intervention)Fishing with a Good Rod, Fishing with a Super Rod · Lv 25–55
- Lake Verity (before Galactic intervention)Fishing with a Good Rod, Fishing with a Super Rod · Lv 25–55
- Road 203Fishing with a Super Rod · Lv 30–55
- Road 204 (north, towards Floaroma Town)Fishing with a Super Rod · Lv 30–55
- Road 204 (south, towards Jubilife City)Fishing with a Super Rod · Lv 30–55
- Road 208Fishing with a Super Rod · Lv 30–55
- Road 209Fishing with a Super Rod · Lv 30–55
- Road 212 (north, towards Hearthome City)Fishing with a Super Rod · Lv 30–55
- Road 214Fishing with a Super Rod · Lv 30–55
- Road 229Fishing with a Super Rod · Lv 30–55
- Sendoff SpringFishing with a Super Rod · Lv 30–55
- Twinleaf TownFishing with a Super Rod · Lv 30–55
Pearl 13 areas
- Lake AcuityFishing with a Super Rod · Lv 20–50
- Lake ValorFishing with a Super Rod · Lv 20–50
- Lake Verity (after Galactic intervention)Fishing with a Super Rod · Lv 20–50
- Lake Verity (before Galactic intervention)Fishing with a Super Rod · Lv 20–50
- Resort AreaFishing with a Super Rod · Lv 20–50
- Road 203Fishing with a Super Rod · Lv 20–50
- Road 204 (north, towards Floaroma Town)Fishing with a Super Rod · Lv 20–50
- Road 204 (south, towards Jubilife City)Fishing with a Super Rod · Lv 20–50
- Road 209Fishing with a Super Rod · Lv 20–50
- Road 212 (north, towards Hearthome City)Fishing with a Super Rod · Lv 20–50
- Road 214Fishing with a Super Rod · Lv 20–50
- Sendoff SpringFishing with a Super Rod · Lv 20–50
- Twinleaf TownFishing with a Super Rod · Lv 20–50
Diamond 13 areas
- Lake AcuityFishing with a Super Rod · Lv 20–50
- Lake ValorFishing with a Super Rod · Lv 20–50
- Lake Verity (after Galactic intervention)Fishing with a Super Rod · Lv 20–50
- Lake Verity (before Galactic intervention)Fishing with a Super Rod · Lv 20–50
- Resort AreaFishing with a Super Rod · Lv 20–50
- Road 203Fishing with a Super Rod · Lv 20–50
- Road 204 (north, towards Floaroma Town)Fishing with a Super Rod · Lv 20–50
- Road 204 (south, towards Jubilife City)Fishing with a Super Rod · Lv 20–50
- Road 209Fishing with a Super Rod · Lv 20–50
- Road 212 (north, towards Hearthome City)Fishing with a Super Rod · Lv 20–50
- Road 214Fishing with a Super Rod · Lv 20–50
- Sendoff SpringFishing with a Super Rod · Lv 20–50
- Twinleaf TownFishing with a Super Rod · Lv 20–50
LeafGreen 6 areas
- Berry ForestFishing with a Super Rod · Lv 20–30
- Fuchsia CityFishing with a Super Rod · Lv 20–30
- Safari Zone (Area 1, east)Fishing with a Super Rod · Lv 20–30
- Safari Zone (Area 2, north)Fishing with a Super Rod · Lv 20–30
- Safari Zone (Area 3, west)Fishing with a Super Rod · Lv 20–30
- Safari Zone (middle)Fishing with a Super Rod · Lv 20–30
FireRed 6 areas
- Berry ForestFishing with a Super Rod · Lv 20–30
- Fuchsia CityFishing with a Super Rod · Lv 20–30
- Safari Zone (Area 1, east)Fishing with a Super Rod · Lv 20–30
- Safari Zone (Area 2, north)Fishing with a Super Rod · Lv 20–30
- Safari Zone (Area 3, west)Fishing with a Super Rod · Lv 20–30
- Safari Zone (middle)Fishing with a Super Rod · Lv 20–30
Emerald 2 areas
- Safari Zone (NW/mach bike area)Fishing with a Super Rod · Lv 25–40
- Safari Zone (SW)Fishing with a Super Rod · Lv 25–40
Sapphire 2 areas
- Safari Zone (NW/mach bike area)Fishing with a Super Rod · Lv 25–40
- Safari Zone (SW)Fishing with a Super Rod · Lv 25–40
Ruby 2 areas
- Safari Zone (NW/mach bike area)Fishing with a Super Rod · Lv 25–40
- Safari Zone (SW)Fishing with a Super Rod · Lv 25–40
Crystal 18 areas
- Cerulean CityFishing with a Super Rod, Surfing · Lv 10–40
- Dark Cave (Blackthorn City entrance)Fishing with a Super Rod · Lv 40
- Dark Cave (Violet City entrance)Fishing with a Super Rod · Lv 40
- Mount Mortar (1F)Fishing with a Super Rod, Surfing · Lv 20–40
- Mount Mortar (B1F)Fishing with a Super Rod, Surfing · Lv 20–40
- Mount Mortar (Upper Cave)Fishing with a Super Rod, Surfing · Lv 25–40
- Mount Silver (2F)Fishing with a Super Rod, Surfing · Lv 35–40
- Road 10Fishing with a Super Rod, Surfing · Lv 15–40
- Road 24Fishing with a Super Rod, Surfing · Lv 10–40
- Road 25Fishing with a Super Rod, Surfing · Lv 10–40
- Road 4Surfing · Lv 10–14
- Road 42Fishing with a Super Rod, Surfing · Lv 20–40
- Road 9Fishing with a Super Rod, Surfing · Lv 15–40
- Slowpoke Well (1F)Fishing with a Super Rod · Lv 40
- Slowpoke Well (B1F)Fishing with a Super Rod · Lv 40
- Tohjo FallsFishing with a Super Rod, Surfing · Lv 20–40
- Union Cave (1F)Fishing with a Super Rod · Lv 40
- Union Cave (B1F)Fishing with a Super Rod · Lv 40
Silver 18 areas
- Cerulean CityFishing with a Super Rod, Surfing · Lv 10–40
- Dark Cave (Blackthorn City entrance)Fishing with a Super Rod · Lv 40
- Dark Cave (Violet City entrance)Fishing with a Super Rod · Lv 40
- Mount Mortar (1F)Fishing with a Super Rod, Surfing · Lv 20–40
- Mount Mortar (B1F)Fishing with a Super Rod, Surfing · Lv 20–40
- Mount Mortar (Upper Cave)Fishing with a Super Rod, Surfing · Lv 25–40
- Mount Silver (2F)Fishing with a Super Rod, Surfing · Lv 35–44
- Road 10Fishing with a Super Rod, Surfing · Lv 15–40
- Road 24Fishing with a Super Rod, Surfing · Lv 10–40
- Road 25Fishing with a Super Rod, Surfing · Lv 10–40
- Road 4Surfing · Lv 10–14
- Road 42Fishing with a Super Rod, Surfing · Lv 20–40
- Road 9Fishing with a Super Rod, Surfing · Lv 15–40
- Slowpoke Well (1F)Fishing with a Super Rod · Lv 40
- Slowpoke Well (B1F)Fishing with a Super Rod · Lv 40
- Tohjo FallsFishing with a Super Rod, Surfing · Lv 20–40
- Union Cave (1F)Fishing with a Super Rod · Lv 40
- Union Cave (B1F)Fishing with a Super Rod · Lv 40
Gold 18 areas
- Cerulean CityFishing with a Super Rod, Surfing · Lv 10–40
- Dark Cave (Blackthorn City entrance)Fishing with a Super Rod · Lv 40
- Dark Cave (Violet City entrance)Fishing with a Super Rod · Lv 40
- Mount Mortar (1F)Fishing with a Super Rod, Surfing · Lv 20–40
- Mount Mortar (B1F)Fishing with a Super Rod, Surfing · Lv 20–40
- Mount Mortar (Upper Cave)Fishing with a Super Rod, Surfing · Lv 25–40
- Mount Silver (2F)Fishing with a Super Rod, Surfing · Lv 35–44
- Road 10Fishing with a Super Rod, Surfing · Lv 15–40
- Road 24Fishing with a Super Rod, Surfing · Lv 10–40
- Road 25Fishing with a Super Rod, Surfing · Lv 10–40
- Road 4Surfing · Lv 10–14
- Road 42Fishing with a Super Rod, Surfing · Lv 20–40
- Road 9Fishing with a Super Rod, Surfing · Lv 15–40
- Slowpoke Well (1F)Fishing with a Super Rod · Lv 40
- Slowpoke Well (B1F)Fishing with a Super Rod · Lv 40
- Tohjo FallsFishing with a Super Rod, Surfing · Lv 20–40
- Union Cave (1F)Fishing with a Super Rod · Lv 40
- Union Cave (B1F)Fishing with a Super Rod · Lv 40
Yellow 4 areas
- Cerulean Cave (1F)Fishing with a Super Rod · Lv 35–55
- Cerulean Cave (B1F)Fishing with a Super Rod · Lv 40–60
- Cerulean CityFishing with a Super Rod · Lv 30–40
- Road 24Fishing with a Super Rod · Lv 30
Blue 4 areas
- Cerulean Cave (1F)Fishing with a Super Rod · Lv 23
- Cerulean Cave (B1F)Fishing with a Super Rod · Lv 23
- Fuchsia CityFishing with a Super Rod · Lv 23
- Road 23Fishing with a Super Rod · Lv 23
Red 4 areas
- Cerulean Cave (1F)Fishing with a Super Rod · Lv 23
- Cerulean Cave (B1F)Fishing with a Super Rod · Lv 23
- Fuchsia CityFishing with a Super Rod · Lv 23
- Road 23Fishing with a Super Rod · Lv 23
Locations cover Red & Blue to Sword & Shield (with its DLC) and Let’s Go. We don’t have them yet for Legends: Arceus, Brilliant Diamond & Shining Pearl, Scarlet & Violet and Legends: Z-A.